
How to Install a Printer Driver on Windows, Mac and Linux
One of the primary worries of a printer user is the procedures for installing the essential drivers and other features of the printer. Of all the conditions and factors, the Operating system versions are the most important one. Common OS include Microsoft Windows, Macintosh, and Linux. This article will expound on the step by step procedure of installing the drivers for primary printer groups concerning your Operating system versions.
How to install printer driver on Microsoft Windows
The latest iterations of Windows encompass Windows Vista, Windows 7, Windows 8, Windows 8.1, and Windows 10. Herein, lies the essential protocol for installing downloaded printer drivers on systems that run the aforementioned Windows operating systems: 1. Firstly, download the printer driver from the manufacturer’s website. 2. Open the downloaded file and extract its contents. 3. Next, navigate to the Control Panel, and select the “Devices and Printers” option. 4. Click on the “Add a printer” button, and select the “Local printer” option. 5. Choose the port to which the printer is connected and click on “Next.” 6. Select the printer manufacturer and model, and click on “Next.” 7. If the driver for the selected printer is not listed, click on “Have Disk” and select the location of the extracted printer driver files. 8. Click on “Next” to complete the printer driver installation. By adhering to these steps, you can successfully install the printer driver on your Windows OS without any hassle.
- Start by Turning off the Printer
- Double-click on the downloaded driver installer file and the program will start running. Note that for the above-listed Windows versions, it pops up a command dialog box whenever you are trying to start or install or uninstall any software or program. Secondly, another request that may pop up is that of the Administrator permission that will require your confirmation before you proceed. Just click YES or ALLOW or CONTINUE to advance on the process. However, if you did not log in as an Administrator, the system will require you to log out your user and sign in again, now as an administrator before restarting the program from Step 2.
On giving the administrative rights, the installation process begins and shows the Progress. Take note of actions that will be displayed on the screen as required on the way and respond accordingly. - When the process finishes, click COMPLETE. The printer interface may be displayed afterward to confirm the device is now ready for use. It is strongly advisable to restart your computer each time you install any program or driver or software.
To employ the printer across a computer network, opt for the connection option available from the Client. Alternatively, you may opt to manually select a connection by accessing the Connect cable window and clicking CANCEL. You will then be prompted to confirm your selection before proceeding to utilize the printer.
How to install printer driver on Macintosh OS
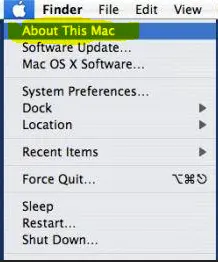
- Select About This Mac from the Apple menu.
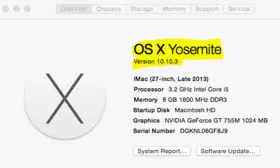
- Find out which macOS your Mac is using.
When it comes to installing printer drivers on a Mac OS system, there is a distinctive requirement to identify the brand and model of the printer. To get started, conduct an online search for the printer model and its latest compatible drivers. Once you have the necessary information, follow the steps outlined below to successfully install the drivers and get your printer up and running. First, ensure that your printer is connected to your Mac and turned on. Next, open the “System Preferences” menu and select “Printers & Scanners.” From there, click the “+” icon to add a new printer. In the “Add Printer” dialog box, select the appropriate printer brand and model from the list. If you cannot find your printer, click the “IP” tab and enter the printer’s IP address. This will allow your Mac to recognize the printer and install the necessary drivers. Once you have selected your printer, click “Add” to install the drivers. Your Mac will automatically download and install the necessary software. Once the installation is complete, your printer should be ready to use. By following these steps, you can ensure that your printer drivers are properly installed on your Mac OS system. With these drivers in place, you can begin using your printer to its full potential.
- The first step is mounting the disk by double-clicking on the downloaded image file. This step unpacks the archive and fits it on the appropriate installer
- Identify the name of the particular data to install and double-click it to start the process properly
- The installation procedure begins. Pay attention to the messages and respond accordingly. If there is a prompting to accept or agree to the terms of the Software License Agreement, scan through and accept the terms.
- Choose the destination of the installation process and click on CONTINUE
- Click INSTALL. The administrator requires you to input the Username and Password of the admin and click on INSTALL
- Complete the process of installation and close the page
- Finally, the system notifies you on successful completion of the installation process
- Restart the system before the use of the printer.
How to install printer driver on Linux
To successfully execute the installation of a printer driver on a LINUX operating system, the initial step is to ascertain the printer’s brand and specific model. Utilizing this information, one can then proceed to download the software optimized for the particular device. Once the software has been obtained, the following sequence of actions should be undertaken to finalize the installation process:
- When you have downloaded the particularly needed software, connect the printer
- Make sure that the printer links correctly to your PC or the required network of computers
- Go to “Systems” and proceed to “Printers.” The system proceeds to the printer screen
- Click on “Add” button with a plus sign before it to add a new printing device
- A screen pops up where you can insert the device URL that you have identified or local a network printer or software on the downloaded folder
- Fill the information and proceed
- Complete the installation progression and restart your computer
Enjoy your printer